Generally, a network-attached storage or NAS facilitates a centralized location on your network to store data, back up, access, and share files. On the other hand, DS923+ helps to manage the workload of the most demanding applications. However, with the Synology DS923+ setup, you can enjoy an efficient 4-bay capable NAS solution to handle and adjust as per the user’s storage needs.
However, it is powered by the ‘Synology DiskStation Manager’ and offers an all-in-one and flexible solution for data sharing, backup, synchronization, and surveillance. So, if you want to make the most of this device, then you need to know How To Setup Synology NAS DS923+. Therefore, this guide sheds light on this computer configuration process. So, let’s dive in!
What Are the Different Ways For the Synology DS923+ Setup?
Before you begin with the Synology 4-Bay Diskstation DS923+ configuration, you must have some essential things with you. These things are a strong internet connection, sufficient memory, accurate login details, etc.
After that, follow a proper series of steps to complete this process. But, installing and setting up the Synology DS923+ seems a daunting process for a non-IT person. However, if you follow the proper instructions to install and configure this device, as given below:
Installing the Synology DS923+
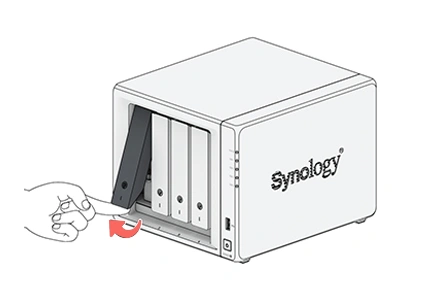
- Initially, remove the drive tray from the Synology diskstation.
- Then, load the drives in the drive trays.
- Now, remove the fastening panels, place the drives in the drive trays, and insert the fastening panels.
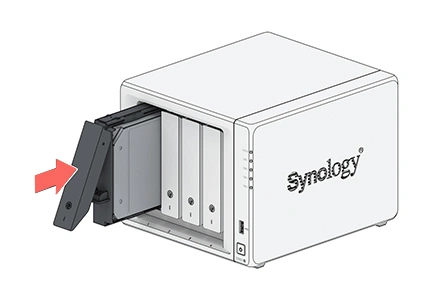
- Further, insert the loaded drive tray into the empty Synology 4-Bay Diskstation DS923+.
- Push the drive bay back till you hear a click, indicating the tray is locked into its place.
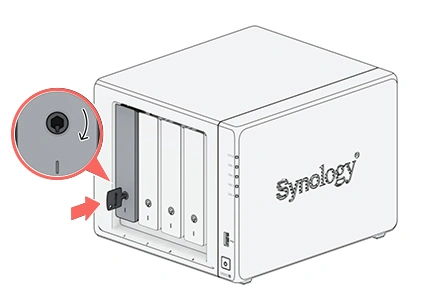
- After that, put the hard drive tray into the hard drive tray lock, turn it clockwise to lock it properly, and then remove the key.
- Perform these steps again to install all the prepared drives.
- Then, number the drives in the diskstation.
- Moreover, you can also add a memory module to the Synology NAS, remove a memory module, install a memory module, etc.
- Follow the instructions given in the manual to proceed with this.
- After that, connect the LAN cable of the NAS to the switch or router to start up the Synology NAS.
- Next, connect the one end of the AC power adapter to the power port of your NAS.
- Now, connect one end of the AC power cord to the AC power adapter and a power outlet.
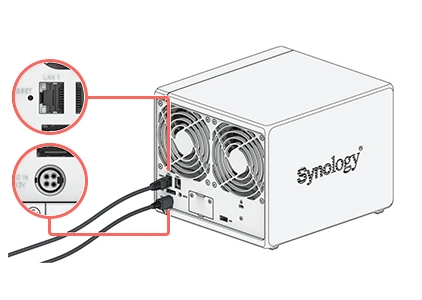
- Further, press the power button on the side of the diskstation.

- Wait till your Synology NAS turns on.
- Finally, your NAS is online and you can connect it to the network.
Tips: Ensure that the drive tray is properly locked, otherwise, it will not function properly. Additionally, to access your NAS remotely over the internet, you can use any of the Synology wifi routers.
How To Access Synology NAS DS923+ Via Web Browser?
- Primarily, connect your computer to the same network as your NAS is connected.
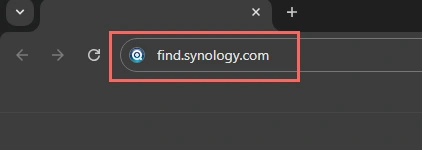
- Now, open any web browser and type the find.synology.com web address in the URL bar.
- Then, download the Synology Assistant app on your computer.
- Further, open the app and select the NAS you want to connect.
- Hereon, double-click on the ‘Connect’ button to connect it.
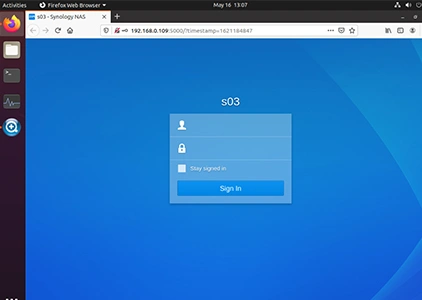
- Now, you see a Welcome message on the screen to start the configuration process.
- Tap on the ‘Install’ button and download the latest version of DSM.
- Hereon, create an admin account for the Synology NAS.
- Mention the device name, admin account name, and password, and confirm the password in the given fields.
- After that, create a QuickConnect account to access your NAS over the internet.
- Follow the on-screen instructions to create this account or skip it.
- Finally, the NAS is ready to use, and follow the further prompts to configure your device accordingly.
- At last, the Synology DS923+ Setup ends here.
Final Words
With this, you have now become familiar with the Synology DS923+ Setup process through our guide. Additionally, this guide taught you the installation and configuration process step-by-step. If you want to know more about this device, get in touch with us!